Send EMAIL

Logo

Application

Download PDF

X-Ray Fluorescence Tester : XDV-µ

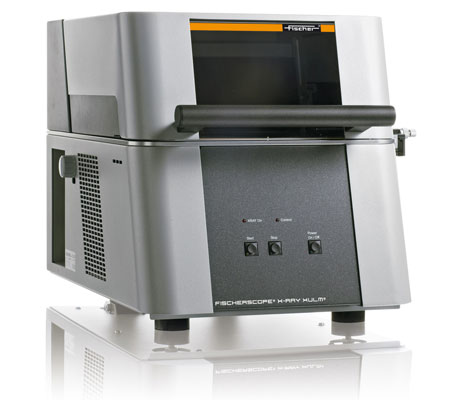
Coating thickness gauge for electroplating and electroless coatings XDV-µ or X-Ray Fluorescence Tester is available in various technical specifications. These are widely used for non-destructive analyses and measurements of coating thickness on very small components and structures, even with complex coating systems.

ask for price
Coating Thickness Gauge For Electroplating and Electroless Coating : XUL

Software Used : WinFTM®
Design Standards : DIN ISO 3497 and ASTM B 568

Typical fields of application

Measurements on very small flat components and structures such as printed circuit boards, contacts or lead frames

Analysis of very thin coatings, e.g., gold/palladium coatings of ≤ 0.1 μm (0.004 mils)

Measurement of functional coatings in the electronics and semiconductor industries

Determination of complex multi-coating systems

Automated measurements, e.g., in quality control

General Specification

Intended use:Energy dispersive x-ray fluorescence measuring instrument (EDXRF) to

measure thin coatings and coating systems on very small flat structures.


Element range:Aluminum Al (13) to Uranium U (92) – up to 24 elements simultaneously.


Design:Bench-top unit with hood opening upwards and housing with a slot on

the side.

X/Y- and Z-axis electrically driven and programmable

Motor-driven changeable filters


Measuring direction:Top down


X-Ray Source/Detection

X-ray tube:Standard: Micro focus tube with tungsten target and beryllium window

Optional: Micro focus tube with molybdenum target and beryllium window


High voltage:Three steps: 10 kV, 30 kV, 50 kV


Primary filter:4x changeable: Ni 10 μm (0.4 mils); free; Al 1000 μm (40 mils);

Al 500 μm (20 mils)


X-ray optics:Polycapillary


X-Ray Source/Detection
Standard Non halo-free Option 20 μm Halo-free Option 10 μm Non halo-free
Measurement spot, fwhm at Mo-Kα appr. Ø 20 μm (0.8 mils) appr. Ø 20 μm (0.8 mils) appr. Ø 10 μm (0.4 mils)
X-ray detector Peltier-cooled silicon-drift-detector (SDD) Peltier-cooled silicon-drift-detector (SDD) Peltier-cooled silicon-drift-detector (SDD)
Effective detector area 20 mm2 (0.03 in2) 50 mm2 (0.08 in2) 50 mm2 (0.08 in2)


For halo-free capillaries, the radiation intensity for all energies of the x-radiation is concentrated on the nominal measurement spot. For capillaries,indicated as non halofree,radiation intensity with high energies (E > 20 keV) can cover a significantly larger area than the nominal measurement spot.


Sample Alignment

Video Microscope:High-resolution CCD color camera for optical monitoring of the

measurement location along the primary beam axis, manual focusing

and auto-focus, Crosshairs with a calibrated scale (ruler) and spot-

indicator, Adjustable LED illumination, Laser pointer (class 1) to support

accurate specimen placement.


Zoom factor:Up to 1080x (Optical: 30x, 90x, 270x; Digital: 1x, 2x, 3x, 4x)


X-Ray Detection

X-ray detector:Proportional counter tube


Absorber:XULM 240 only: optional cobalt or nickel absorber


Measuring distance:0 … 25 mm (0 … 1 in)


Distance compensation with patented DCM method for simplified

measurements at varying distances. For particular applications or for

higher demands on accuracy anadditional calibration might be necessary.


Evaluation Unit

Computer:Windows®-PC


Software:Standard: Fischer WinFTM® LIGHT

Optional: Fischer WinFTM® BASIC, PDM®, SUPER


Sample support stage

Sample Stage
Standard Option Supporting Plate PCB
Design Fast, programmable XY-stage with pop-out function Fast, programmable XY-stage with pop-out function and large placement area for measurements on PCBs
Usable sample placement area Width x depth: 370 mm x 320 mm (14.6 in x 12.6 in) Width x depth: 620 mm x 530 mm (24.4 in x 20.9 in)
Usable maximum travel X/Y-axis: 250 mm x 220 mm (9.8 in x 8.7 in) Z-axis: 140 mm (5.5 in) X/Y-axis: 250 mm x 220 mm (9.8 in x 8.7 in) Z-axis: 140 mm (5.5 in)
Max. travel speed X/Y 60 mm/s (0.2 ft/s) 60 mm/s (0.2 ft/s)
Repeatability precision X/Y unidirectional: ≤ 5 μm (0.2 mils) max., ≤ 2 μm (0.08 mils) typ. unidirectional: ≤ 5 μm (0.2 mils) max., ≤ 2 μm (0.08 mils) typ.
Max. sample weight 5 kg (11 lb), with reduced precision max. 20 kg (44 lb) 5 kg (11 lb), with reduced precision max. 20 kg (44 lb)
Max. sample height 135 mm (5.3 in) 135 mm (5.3 in)

Electrical Data

Power supply:AC 115 V or AC 230 V 50 / 60 Hz


Power consumption:max. 120 W, without evaluation PC


Protection class:IP40


Dimensions

External dimensions:Width x depth x height [mm]: 660 x 835 x 720 mm (26 x 33 x 28.3 in)


Weight:Approx. 135 kg (297 lb)


Interior dimensions of Width x depth x height: 580 x 560 x 145 mm (22.8 x 22 x 5.7 in)

chamber:


Environmental Conditions

Operating temperature:10 °C – 40 °C / 50 °F – 104 °F


Storage/Transport0 °C – 50 °C / 32 °F – 122 °F

temperature:


Admissible air humidity:≤ 95 %, non-condensing


Standards

CE approval:EN 61010


X-Ray standards:DIN ISO 3497 and ASTM B 568


Approval:Fully protected instrument with type approval according to

theGerman regulations "Deutsche Röntgenverordnung-RöV".


Get An Instant Quote

Looking for Product Name ?

x

Send SMS Enquiry

*Please Enter Requirment

*Please Enter valid Mobile Number

*Please Enter Proper Name