Send EMAIL

Logo

Application

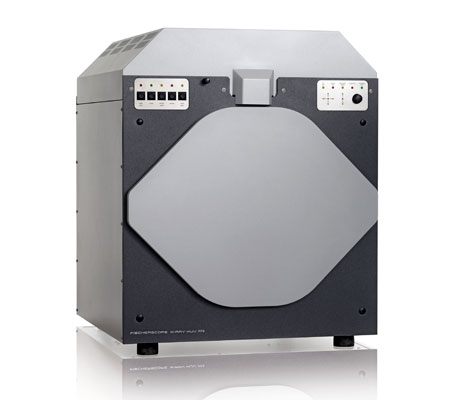
Wafer Coating Thickness Measurement Instrument : XUV 773

Wafer coating thickness instrument - XUV 773 is one of the most preferred selections of clients owing to its precise design and outstanding accuracy. These are high performance X-ray fluorescence measuring instrument with vacuum chamber for non-destructive coating thickness measurement and material analysis. Engineered in accordance with international industrial standard, these devices are widely used for non-destructive analysis of thin coatings, traces and light elements. Up to 24 elements in the range of sodium (11) to uranium (92) can be determined simultaneously. Ergonomically designed these devices also provide facility for the measurement that it can be performed in vacuum, in ambient air or with helium purge (optional). Therefore also organic or wet samples can be analyzed.

ask for price
Wafer Coating Thickness Instrument : XUV 773
Typical areas of application are:

Analysis of very thin coatings of ≤ 0.1 μm (0.004 mils)

Measurements of functional coatings in the electronics and semiconductor industries

Determination of complex multi-coating systems

Automated measurements, e.g., in quality control

Determination of the lead content in solder

General Specification

Intended use:Energy dispersive X-ray fluorescence measuring instrument (EDXRF)

coatings, small structures, trace elements and alloys.


Element range:Sodium Na (11) to Uranium U (92) – up to 24 elements simultaneously.


Design:Bench top unit with motorized opening cylindrical vacuum chamber.

External vacuum pump.Helium purge of measurement chamber (optional)

Programmable motorized X/Y/Z sample stage

High resolution color video camera with a wide magnification range.


Measuring direction:Top down


X-Ray Source

X-ray tube:Micro focus X-ray tube with Rhodium target

(Tungsten, Molybdenum, or other target materials as option)


High voltage:Three steps: 8 kV, 20 kV, 50 kV


Aperture (Collimator):4x changeable: Ø 0.1 mm (3.9 mils), Ø 0.3 mm (11.8 mils),

Ø 1 mm (39.4 mils),Ø 3 mm (118 mils), others on demand


Primary filter:6x changeable: Ni 10 μm (0.39 mils), free, Al 1000 μm (39.4 mils), Al 500 μm

(19.7 mils), Al 100 μm (3.94 mils), Mylar® 100 μm (3.94 mils)


Measurement spot:Depends on measurement distance and used aperture.

Real spot size is displayed on the video screen.

Smallest measurement spot: approx. Ø 0.15 mm (5.9 mils).


X-Ray Detection

X-ray detector:SDD Silicon Drift Detector, peltier-cooled


Resolution (fwhm for Mn-Kα):≤ 140 eV


Measurement distance:0 … 20 mm (0 … 0.8 in), Distance compensation with patented DCM method

for simplified measurements at varying distances. For particular applications

an additional calibration might be necessary.


Sample Alignment

Video microscope:High-resolution CCD color camera for optical monitoring of the

measurement location along the primary beam axis, manual focusing

and auto-focus, crosshairs with a calibrated scale (ruler) and spot-

indicator,adjustable LED illumination of the measurement, Laser pointer

(class 1) to support accurate sample placement.


Video magnification factor:20x … 180x (optical: 20x … 45x; digital: 1x, 2x, 3x, 4x)


Sample Stage

Design:Fast motorized and programmable X/Y/Z sample stage


Travel distance:X-/ Y-/ Z-axis [mm]:100 x 100 x 100, [in]: 3.94 x 3.94 x 3.94


Repeatability precision XY:≤ 0,01 mm (0.39 mils), uni-directional


Support area:Width x depth [mm]: 135 x 135, [in]: 5.31 x 5.31


Max. sample weight:≤ 1 kg (2.2 lb)


Max. sample height:100 mm (3.94 in)


Electrical Data

Power supply:AC 115 V or AC 230 V 50 / 60 Hz


Power consumption:Max. 120 W ,without evaluation PC


Protection class:IP40


Dimensions

External dimensions:Width x depth x height [mm]: 640 x 640 x 760 mm, [in]: 25.2 x 25.2 x 29.2


Interior dimensionsDiameter x depth [mm]: 400 x 390, [in]: 15.8 x 15.3

of chamber:


Weight:approx. 182 kg (401 lb)


Environmental Conditions

Operating temperature:10 °C – 40 °C (50 °F – 104 °F) around the housing


Storage temperature:0 °C – 50 °C (32 °F – 122 °F)


Admissible air humidity:≤ 95 %, non-condensing


Evaluation Unit

Computer:Windows®-PC


Software:Standard: Fischer WinFTM® BASIC including PDM®

Optional: Fischer WinFTM® SUPER


Standards

CE approval:EN 61010


X-Ray standards:DIN ISO 3497 and ASTM B 568


Approval:Individual acceptance inspection as a fully protected instrument according

to the German regulations „Deutsche Röntgenverordnung-RöV“.


Product Details:

Dimension660 x 835 x 720 mm
High VoltageThree steps 10 kV, 40 kV, 50 kV
Protection ClassIP40
X Ray StandardsDIN ISO 3497 and ASTM B 568
BrandFischer
Usage/ApplicationIndustrial
Power SupplyAC 115 V or AC 230 V 50 / 60 HzAC 115 V or AC 230 V 50 / 60 Hz
Get An Instant Quote

Looking for Product Name ?

x

Send SMS Enquiry

*Please Enter Requirment

*Please Enter valid Mobile Number

*Please Enter Proper Name